Tabs are well know for being very useful to everyone, specially for those who have a lot of content on their blogs and spend much time thinking where to place new stuff.
I know there are quite a few tutorials around about making tabs for blogger, but they all have one thing in common, are kind of difficult to implement, and may confuse some users.
The method I developed is inspired in a tutorial from Webitect, I just found it very useful and decided to adapt that technique to Blogger platform. This tutorial will bring you a very easy to implement way to make tabs out of your sidebar widgets, here are some features of my method:
- Easy to install.
- No need edit html in Sidebar part.
- Automatically place your handpicked widgets inside tabs.
- Freedom to set what widgets stay out of the tabs.
- After implementing, Widgets are normally edited from Page Elements section.
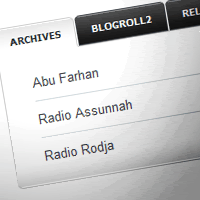
The Final Result
If you want to see it working please check the live demo.
Step 1 - Placing the styles on your CSS
The style of the tabs can be easily changed anytime just using CSS, but this is not the main reason for this tutorial, It’s up to you to change or not, use your own CSS skills. We’ve made a general layout for it, to install it just place the following code right before the ]]></b:skin> line:
/* Tabbed Sidebar Widgets
--------------------------------- */
.widget-wrapper2{
    border:1px solid #494e52;
    background-color:#636d76;
    padding:8px;
}

.widget-tab {
-moz-border-radius-bottomleft:5px;
-moz-border-radius-bottomright:5px;
-moz-border-radius-topright:5px;
-webkit-border-radius-bottomleft:5px;
-webkit-border-radius-bottomright:5px;
-webkit-border-radius-topright:5px;
background:#FFFFFF url(http://i195.photobucket.com/albums/z105/dantearaujo/tabcontentbg.gif) repeat-x scroll left bottom !important;
border:1px solid #CFCFCF;
font-family:Arial,Helvetica,sans-serif;
padding:15px !important;
}

.widget-tab  ul {
    margin:0px;
    padding:0px 20px 0px 20px;
}
.widget-tab  ul li {
    list-style:none;
    border-bottom:1px solid #d6dde0;
    padding-top:10px;
    padding-bottom:10px;
    font-size:13px;
}
.widget-tab  ul li:last-child {
    border-bottom:none;
}
.widget-tab  ul li a {
    text-decoration:none;
    color:#3e4346;
}
.widget-tab  ul li a small {
    color:#8b959c;
    font-size:9px;
    text-transform:uppercase;
    font-family:Verdana, Arial, Helvetica, sans-serif;
    position:relative;
    left:4px;
    top:0px;
}
.tab-content  ul li a:hover {
    color:#a59c83;
}
.tab-content  ul li a:hover small {
    color:#baae8e;
}

.active-tab{
background:#FFFFFF url(http://i195.photobucket.com/albums/z105/dantearaujo/tabtopbg.gif) repeat-x scroll left top !important;
border-color:#CFCFCF #CFCFCF #FFFFFF #CFCFCF !important;
border-style:solid !important;
border-width:1px 1px 2px !important;
color:#282E32 !important;

}

ul.tab-wrapper {
    margin:0px; padding:0px;
    margin-top:5px;
    margin-bottom:6px;
}
ul.tab-wrapper li {
-webkit-border-radius-topleft:5px;
-webkit-border-radius-topright:5px;
-moz-border-radius-topleft:5px;
-moz-border-radius-topright:5px;
background:#191919 url(http://i195.photobucket.com/albums/z105/dantearaujo/tabinactivebg.gif) repeat-x scroll left top;
border:1px solid #464C54;
color:#FFFFFF;
cursor:pointer;
display:inline;
font-family:Verdana,Arial,Helvetica,sans-serif;
font-size:9px;
font-weight:bold;
line-height:2em;
list-style-image:none !important;
list-style-position:outside !important;
list-style-type:none !important;
margin-right:1px;
padding:8px 14px;
text-align:center;
text-decoration:none;
text-transform:uppercase;
}
Step 2 - Installing jQuery Library
This script needs the jQuery JavaScript library, if you already have it installed, you can skip this step, if you don’t just paste the code below right before your </head> line:
<!-- jQuery Call -->

<script src='http://ajax.googleapis.com/ajax/libs/jquery/1.2.6/jquery.min.js' type='text/javascript'/>

<!-- End of jQuery Call -->
Step 3 - Installing the Script
Ok now that you’ve made sure that you have jQuery installed, you need to install the script that will do all the magic for us, just place the following code right before your </head> line:
<script type="text/javascript">
var starttab=0;
var endtab=2;
var sidebarname="sidebar1";
</script>
<script type="text/javascript" src="http://tab-for-blogger.googlecode.com/files/bloggertabv1.0-min.js"></script>
Customizing
As you have noted you’ll get a few lines that can be customized, those are:
var starttab=0;
var endtab=2;
var sidebarname="sidebar";
Very quickly: starttab is the starting number for your chosen widgets, it starts counting from 0. endtab is the number for your last included widget. sidebarname is your sidebar’s id, it is generally just “sidebar”, but just in case you have a different id, we’ll help you finding the right one to place here.
How to find your sidebar’s ID
Ok if you have installed the script and it is not working, you may have a different sidebar ID that is not only “sidebar”, use the following methods to find he right id of your sidebar.
Method 1 - Getting from the HTML
This one may be the fastest one, if you use Minima template, or any template derived from it, just go to Layout > Edit HTML > Search for “sidebar-wrapper” and you may get something like this:
<div id='sidebar-wrapper'>

<b:section class='sidebar' id='sidebar' preferred='yes'>
Just take a closer look and you will find it id='sidebar'.
Method 2 - Using Firebug
Firebug is the most wonderful Firefox extension for web developers, If you dont have it, just download it from here.

Method 3 - Using Web developer Firefox Plugin
This is another great extension, if you don't have it, get it here.

Ok now that you have installed the script on your blog, you should be able to normally edit your widgets on your page elements section.
What are the Gadget Numbers
Here is a simple explanation for those who haven’t understand the numbers yet. Let’s say that you want make tabs out of your first 3 widgets, so your starting number will be 0 and your finishing number will be 2:
var starttab=0;
var endtab=2;
var sidebarname="sidebar";
Check images below for better understanding:


In this case, Widget 3 and 4 will not get any tabs, because your finishing number was 2. Very easy huh?
Advices
- This script works for only one sidebar per blog.
- We have included a general styles for your tabs, however, you can use your CSS skills to customize them, but be aware that CSS related errors will not be supported here, make sure you do the right thing.
- All the tabbed widgets need to have a title.
Final Words
This is a new script that I have develop specially for Bloggertuts, I hope it will help many people and will be easy for any person to install it, even the beginners. If you use this script, don’t hesitate to comment here to showcase your result, specially if you have created a new style to it. Also if you have any questions just drop a comment or contact us. Remember to subscribe and follow us on twitter.